... it rained today!! What a surprise ...so I thought I would stay in and do some ironing!! OH YES I do occasionally do some housework! Mind you I had a lovely chat to Sally (daughter) on SKYPE while I was doing it so it did not seem such a chore xx
I also did a different type of ironing... because I worked on one of my Mini-Round-Robin swaps for this month...
WHY did I start a border with such small pieces? I have NO idea! I must of had a brain storm of some sort!! Now I have started I have to carry on!! Hey-Ho!!
I feel it is time to put my feet up, have a cuppa and read this..
the postman has been again lol x
Keep smiling
Diane xx
... there are going to be LOTS of pictures in this post... because this is the one that I promised you ... to show how I made the mug/candle mat xx
First off you need to have a template or a ruler to make the "plates" for the Dresden plate... I am posh and have a ruler !! If you don't have a ruler there are lots of published patterns for making templates xx These are cut from 5 inch wide fabric... if you use a charm square you get 2.. if you use a jelly role strip you get ... quite a lot!!
I intend to make a few (!!) mats ... even so I think I went a bit mad !! lol xx..
then you need to start finding the ones you want to put together... I used 10 "wedges" to make mine .. it just depends on how you sew and how you want it to look ..
then you iron them all in half...don't be tempted to skip this stage .. it helps later..HONESTLY...
THEN sew along the top.. if you strip sew you get some bunting!!...
then turn then right way... and line up the top with the ironed line...SEE.. it was worth ironing that crease in as you now have a measure to keep them all the same and centered..
then sew all the wedges together..
the back ground I cut 6.5 x 12.5 ..I folded in half and used those marks to centre the placement and pin in place..
sew down in your favourite way... I do it by hand, but its up to you xx Then layer up. I used a cotton rich wadding ..then the insulated stuff... (I didn't have enough for one piece..so I patched it!!.. well its Sunday and I want to show you how to do it!! it doesn't show when finished... bet you forget all about it x)... then I used this great fabric that is all about tea for the back xx..
Then quilt it... at the moment my fav is the curvy stitch on my machine ,,, I use the machine because the many layers make it difficult to do by hand xx..
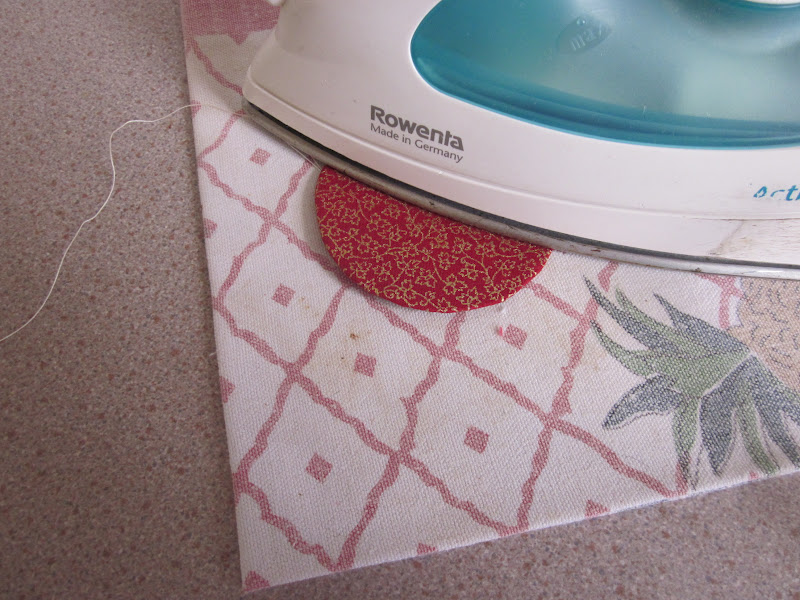
Then make a circle... I made a circle of cardboard, draw a circle on the fabric , sew a line of tacking, pull around the cardboard. tie off, iron over the cardboard,take it out and iron again. then fold and cut in half..
and sew it down onto the mat... covers up the edge of the quilting nicely..
then sew on the binding...AND if you are still with me ..... you have a mug/candle mat ..
so much fun!!
Keep smiling
Diane xx
...I was in and out like a fiddlers elbow!! AND I got wet through every time I went out!!
The last part of the day was to attend a concert given by the choirs of 6 schools... Josh (grandson no 1) was singing....and they were BRILLIANT. EVERY song was in tune... not bad for 8-12 year olds xx
SO ... after tea and a cuppa it was ME time xx I had such a good time with the mug mat for my swap partner that I decided I would make another one..
THEN I started thinking about Christmas...
and how it is always good to be ahead of the rush..
they came together so easily..
I will DEFINITELY be making some more. I may just take some pictures and show you all just how easy it is xx
Keep smiling
Diane xx
...today.. it was such a shock I HAD to go to the garden centre!! Well I have to support the local economy.. now be honest!
Its all planted and looking good x
The postman brought me an exciting envelope as well....this is Celine's Halloween block for me to work on,,(you may notice the shadow.. I told you the sun came out!!)
LOOKING GOOD.. thinking cap on now for the next round. This is my block..
again thinking cap is on. xx this fabric is great... those eyes are watching!!
I made my mug mat last night.My swap partner (Cathy) said I could use any colour and any pattern... how cool is that!! I like her!... SO.... this is what I made..
I LOVE IT!!
It is going to be hard to put this one in the post xx
I just may have to make another one ..or two!
Keep smiling
Diane xx
...
at this wonderful block that arrived in the post today..
It came from Sandy in Maine. It is my first block in this swap xx This is the block I sent her..
I have finished my rota....Hoo-Ray!! So tonight I am working on my Christmas Mug Mat swap xx Hopefully will have pictures to post tomorrow x
Keep smiling
Diane xx
...today. I thought I would show you the little quilt/wall hanging that was my introduction to foundation piecing.....
I used lots of scraps from my stash...
so, from a distance it looks like the fabrics are all the same..
but NO! (don't you want to pick off that bit of cotton!!! I am going to do it NOW!!!)
I (as you know!) like to embellish... so lots of leaves and a spider, and some acorns...
It was a fun project to work on..
and it got me addicted to foundation work!!
keep smiling
Diane xx